Thursday, June 4, 2020

Sslmerge - Tool To Help You Build A Valid SSL Certificate Chain From The Root Certificate To The End-User Certificate


Is an open source tool to help you build a valid SSL certificate chain from the root certificate to the end-user certificate. Also can help you fix the incomplete certificate chain and download all missing CA certificates.

How To Use
It's simple:
# Clone this repository
git clone https://github.com/trimstray/sslmerge

# Go into the repository
cd sslmerge

# Install
./setup.sh install

# Run the app
sslmerge -i /data/certs -o /data/certs/chain.crt
  • symlink to bin/sslmerge is placed in /usr/local/bin
  • man page is placed in /usr/local/man/man8

Parameters
Provides the following options:
  Usage:
sslmerge <option|long-option>

Examples:
sslmerge --in Root.crt --in Intermediate1.crt --in Server.crt --out bundle_chain_certs.crt
sslmerge --in /tmp/certs --out bundle_chain_certs.crt --with-root
sslmerge -i Server.crt -o bundle_chain_certs.crt

Options:
--help show this message
--debug displays information on the screen (debug mode)
-i, --in add certificates to merge (certificate file, multiple files or directory with ssl certificates)
-o, --out saves the result (chain) to file
--with-root add root certificate to the certificate chain

How it works
Let's start with ssllabs certificate chain. They are delivered together with the sslmerge and can be found in the example/ssllabs.com directory which additionally contains the all directory (containing all the certificates needed to assemble the chain) and the server_certificate directory (containing only the server certificate).
The correct chain for the ssllabs.com domain (the result of the openssl command):
Certificate chain
0 s:/C=US/ST=California/L=Redwood City/O=Qualys, Inc./CN=ssllabs.com
i:/C=US/O=Entrust, Inc./OU=See www.entrust.net/legal-terms/OU=(c) 2012 Entrust, Inc. - for authorized use only/CN=Entrust Certification Authority - L1K
1 s:/C=US/O=Entrust, Inc./OU=See www.entrust.net/legal-terms/OU=(c) 2012 Entrust, Inc. - for authorized use only/CN=Entrust Certification Authority - L1K
i:/C=US/O=Entrust, Inc./OU=See www.entrust.net/legal-terms/OU=(c) 2009 Entrust, Inc. - for authorized use only/CN=Entrust Root Certification Authority - G2
2 s:/C=US/O=Entrust, Inc./OU=See www.entrust.net/legal-terms/OU=(c) 2009 Entrust, Inc. - for authorized use only/CN=Entrust Root Certification Authority - G2
i:/C=US/O=Entrust, Inc./OU=www.entrust.net/CPS is incorporated by reference/OU=(c) 2006 Entrust, Inc./CN=Entrust Root Certification Authority
The above code presents a full chain consisting of:
  • Identity Certificate (Server Certificate)
    issued for ssllabs.com by Entrust Certification Authority - L1K
  • Intermediate Certificate
    issued for Entrust Certification Authority - L1K by Entrust Root Certification Authority - G2
  • Intermediate Certificate
    issued for Entrust Root Certification Authority - G2 by Entrust Root Certification Authority
  • Root Certificate (Self-Signed Certificate)
    issued for Entrust Root Certification Authority by Entrust Root Certification Authority

Scenario 1
In this scenario, we will chain all delivered certificates. Example of running the tool:

Scenario 2
In this scenario, we only use the server certificate and use it to retrieve the remaining required certificates. Then, as above, we will combine all the provided certificates. Example of running the tool:

Certificate chain
In order to create a valid chain, you must provide the tool with all the necessary certificates. It will be:
  • Server Certificate
  • Intermediate CAs and Root CAs
This is very important because without it you will not be able to determine the beginning and end of the chain.
However, if you look inside the generated chain after generating with sslmerge, you will not find the root certificate there. Why?
Because self-signed root certificates need not/should not be included in web server configuration. They serve no purpose (clients will always ignore them) and they incur a slight performance (latency) penalty because they increase the size of the SSL handshake.
If you want to add a root certificate to the certificate chain, call the utility with the --with-root parameter.

Certification Paths
Sslmerge allows use of two certification paths:

Output comments
When generating the chain of certificates, sslmerge displays comments with information about certificates, including any errors.
Here is a list of all possibilities:

not found identity (end-user, server) certificate
The message is displayed in the absence of a server certificate that is the beginning of the chain. This is a unique case because in this situation the sslmerge ends its operation displaying only this information. The server certificate is the only certificate required to correctly create a chain. Without this certificate, the correct chain will not be created.

found correct identity (end-user, server) certificate
The reverse situation here - message displayed when a valid server certificate is found.

not found first intermediate certificate
This message appears when the first of the two intermediate certificates is not found. This information does not explicitly specify the absence of a second intermediate certificate and on the other hand it allows to determine whether the intermediate certificate to which the server certificate was signed exists. Additionally, it can be displayed if the second intermediate certificate has been delivered.

not found second intermediate certificate
Similar to the above, however, it concerns the second intermediate certificate. However, it is possible to create the chain correctly using the second certification path, e.g. using the first intermediate certificate and replacing the second with the main certificate.

one or more intermediate certificate not found
This message means that one or all of the required intermediate certificates are missing and displayed in the absence of the root certificate.

found 'n' correct intermediate certificate(s)
This message indicates the number of valid intermediate certificates.

not found correct root certificate
The lack of the root certificate is treated as a warning. Of course, when configuring certificates on the server side, it is not recommended to attach a root certificate, but if you create it with the sslmerge, it treats the chain as incomplete displaying information about the incorrect creation of the chain.

an empty CN field was found in one of the certificates
This message does not inform about the error and about the lack of the CN field what can happen with some certificates (look at example/google.com). Common Name field identifies the host name associated with the certificate. There is no requirement in RFC3280 for an Issuer DN to have a CN. Most CAs do include a CN in the Issuer DN, but some don't, such as this Equifax CA.

Requirements
Sslmerge uses external utilities to be installed before running:

Other

Contributing
See this.

Project architecture
See this.


More information


Android SSHControl V1.0 Relased!!!

Hoy sabado 15, he subido al Market de Android la versión 1.0 de SSHControl, con nuevas funcionalades y la esperada opción "Custom Commands".


Esta aplicación permite controlar tus servidores linux, bsd y unix con solo un dedo, mediante esta app Android.
Y soluciona las siguientes problemáticas:
- Manejar una shell desde el pequeño teclado de un móvil es engorroso.
- Leer todos los resultados de un comando en la pantalla del móvil, nos dejamos la vista.

Esta app permite interactuar con servidores remotos simplemente haciendo pulsaciones en la pantalla, mediante un explorador de ficheros, de conexiones, etc..

Las funcionalidades nuevas de esta versión 1.0 son:

- Administración del Firewall Iptables.
- Opción de Custom Commands, tal como había prometido.

Las funcionalidades ya presentes en la v0.8 son:

- escalada a root mediante su y sudo
- gestor de procesos
- explorador de ficheros, editor de ficheros, editor de permisos.
- monitorización y baneo de conexiones
- Visualizadores de logs
- administrador de drivers
- estadisticas de disco

Para la versión 2.0 preveo:

- Escuchar música remota
- Descarga de ficheros (wget)
- Transferencia segura de ficheros entre servidores (scp)
- Gestures, para administrar los sitemas en plan minority report :)

App disponible en el market para 861 tipos de dispositivos y pronto disponible en tablets.

https://market.android.com/details?id=net.ssh.SSHControl

Cualquier sugerencia de mejora: sha0 [4t] badchecksum [d0t] net

More info


How To Hack Any Game On Your Android Smartphone

How To Hack Any Game On Android 2018

How To Hack Any Game On Your Android Smartphone

By hacking android game you can unlock all the levels, use any resource according to your wish and lots more. Proceed with the method shown below to hack any game on your Android. But sometimes while playing our favorite game we get short on our resources that are needed to play that game, like power, weapons or lives etc. That consequence really becomes bothersome, so to overcome this we are here with the trick How To Hack Any Game On Android.

Today millions of character are using the android phone. Now an Android device enhances significant part of our life. Everyone loves to play games on their android device. There are lots of cool games that are today available on your Android device in Google Play Store.


How To Hack Any Game On Android 2018

Hack Any Game On Android
How To Hack Any Game On Your Android Smartphone
Now it's time to hack into the game and use any resources that you want to play at any level of the game. The method is really working and will let you alter the game according to your wish. Just proceed with simple steps below.

Steps To Hack Any Game On Android

Step 1. First of all after rooting your android device open the GameCIH App. It will ask you for superuser access, grant it.(This will only come if you have properly rooted your android device. Now on the home screen of this app, you will see Hot-Key option, select any of them which you feel more convenient while using in your android.
Hack Any Game On Android
How To Hack Any Game On Your Android Smartphone
Step 2. Now open the game that you want to hack into your android device. Now pause the game and access the hotkeys displaying there, select any value that you want to edit in your game. Like any of text value like keys of subway surfer game.
Hack Any Game On Android.2
How To Hack Any Game On Your Android Smartphone
Step 3. Enter your desired value in the text field box appeared there and click on done. Now you will see default value will get replaced with your value. Similarly, you can alter any values in any of the game according to your wish.
Hack Any Game On Android.3
How To Hack Any Game On Your Android Smartphone
That's it game hacking is done, Now you can access any resources using this hack.
So above is all about Hack Any Game On Android. With the help of this trick, you can alter any coins, lives, money, weapons power and lots more in any of your favorite android game and can enjoy the unlimited game resources according to your wish.

Using Game Guardian

Game Guardian Apk is one of the best apps which you can have on your Android smartphone. With the help of this app, you can easily get unlimited coins, gems and can perform all other hacks. However, Game Guardian Apk needs a rooted Android smartphone to work. Here's a simple guide that will help you.
Step 1. First of all, you need to download the latest version of Game Guardian on your Android smartphone from the given download link above or below.
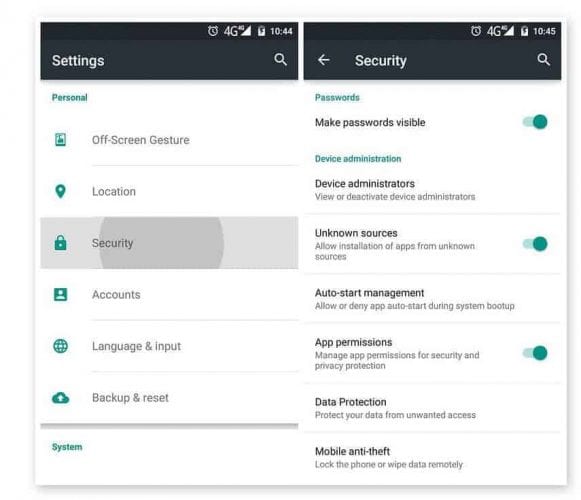
Step 2. After downloading on your smartphone, you need to enable the Unknown Source on your device. For that, you need to visit Settings > Security > Unknown Sources
Using Game Guardian
Using Game Guardian
Step 3. Now install the app and then press the home button to minimize the app. Now open any game that you want to hack. You will see an overlay of Game Guardian App icon. Tap on it.
Step 4. Now you need to tap on the Search Button and set the value. If you don't know the values, then simply set it to auto.
Using Game Guardian
Using Game Guardian
Step 5. You need to search for the value which you want to hack like money, gem, health, score etc. You can change all those values. Suppose, if you need to decrease the number of values, you need to scan again for the new value.
Using Game Guardian
Using Game Guardian
Step 6. Finally, you need to select all the values and then change it to infinite numbers like '9999999' or whatever you want.
Using Game Guardian
Using Game Guardian
That's it, you are done! This is how you can use Game Guardian Apk to hack games on your Android smartphone.
With this, you can play a game at any levels without any shortage of any resource that can interrupt your gameplay. Hope you like this coolest android game hack. Don't forget to share it with others too.

Read more


  1. Pentest Process
  2. Hacking Attack
  3. Hacker Videos
  4. Pentest Meaning
  5. Hacking Tutorials
  6. Hacking Gif
  7. Pentest Uk
  8. Pentest Basics
  9. Pentest Report

Wednesday, June 3, 2020

Nmap: Getting Started Guide


Nmap is a free utility tool for network discovery, port scanning and security auditing, even though we can use it for more than that but in this article we will learn how to do these three things with nmap.

The original author of nmap is Gordon Lyon (Fyodor). Nmap is licensed under GPL v2 and has available ports in many different languages. Nmap is available for Linux, Windows, and Mac OS X. You can download your copy of nmap from their website.

Lets get started with nmap.

When performing pentests we always look for networks we are going to attack. We need to identify live hosts on the network so that we can attack them. There are plenty of tools available for finding live hosts on a network but nmap is one of the best tools for doing this job.

Lets start with simple host (target) discovery scans i,e scans that will tell us which ip address is up on our target network. Those ip addresses which are up on our target network are the ones that are assigned to a device connected on our target network. Every device on the network is going to have a unique ip address.
To perform a simple host discovery scan we use the following command

nmap -v -sn 10.10.10.0/24


flags we used in the above command are
-v for verbose output
-sn to disable port scan (we don't want to scan for ports right now)

Following the flags is the ip address of the target network on which we want to look for live hosts. The /24 at the end of the ip address is the CIDR that specifies the subnet of the network on which we are looking for live hosts.

After running the above command you should get a list of live hosts on your target network.
If you just want to know the list of ip addresses your command is going to scan, you can use the -sL flag of the nmap like this.

nmap -sL 10.10.10.0/24

this command will simply output the list of ip addresses to scan.

We sometimes want to do dns resolution (resolving ip addresses to domain names) when performing our network scans and sometimes we don't want dns resolution. While performing a host discovery scan with nmap if we want to perform dns resolution we use -R flag in our command like this:

nmap -v -sn -R 10.10.10.0/24

And if we don't want to perform dns resolution of hosts during our scan we add the -n flag to our command like this:

nmap -v -sn -n 10.10.10.0/24

After we have discovered the hosts that are up on our target network, we usually put the ip addresses of these hosts into a file for further enumeration.

Next step in our enumeration would be to detect which operating system and which ports are running on these live hosts, for that we run this command:

nmap -O -v 10.10.10.119


here we use -O (capital o not zero) for operating system detection and by default nmap performs SYN Scan for port discovery. However nmap scans for 1000 ports only by default of a particular host.

To make nmap go over a list of ip addresses in a file we use -iL flag like this:

nmap -O -v -iL targetlist

where targetlist is the name of the file which contains ip addresses that we want to perform port scan on.

To make nmap scan all the ports of a target we use the -p flag like this:

nmap -p- -v 10.10.10.121

We can also specify a range of ports using the -p flag like this:

nmap -p1-500 -v 10.10.10.121

here 1-500 means scan all the ports from 1 to 500.

We can use a number of scan techniques to discover open ports on our network but I will only discuss some of them for brevity.

We can perform a TCP SYN scan using nmap with -sS flag like this:

nmap -sS -v 10.10.10.150

We have also flags for TCP connect and ACK scans which are -sT -sA

nmap -sT -v 10.10.10.150

nmap -sA -v 10.10.10.150

We can also perform UDP scan as well instead of TCP scan using -sU flag

nmap -sU -v 10.10.10.150

We can perform TCP Null, FIN, and Xmas scans using the flags -sN, -sF, -sX

nmap -sN -v 10.10.10.150

nmap -sF -v 10.10.10.150

nmap -sX -v 10.10.10.150

If you don't know what these scans are then please visit Port Scanning Techniques and Algorithms for explanation.

After discovering the open ports on our target host, we want to enumerate what services are running on those open ports. To enumerate services and versions information on open ports we use the -sV flag like this:

nmap -sV -v 10.10.10.118

This should give us information about what services are running on what ports and what versions of those services are running on the target host.

nmap has an interesting feature called NSE nmap scripting engine. It allows users to write their own scripts, using the Lua programming language, to automate a wide variety of networking tasks. nmap ships with a diverse set of scripts which are very helpful to enumerate a target. To use the nmap default set of scripts while enumerating the target, we use the -sC flag like this:

nmap -sC -sV -v 10.10.10.118

We can also save the results of our nmap scans to a file using the -o flag like this

nmap -sC -sV -v -oA defaultscan 10.10.10.119

here -oA tells the nmap to output results in the three major formats at once and defaultscan is the name of the file that will be prepended to all the three output files.

This is the end of this short tutorial see you next time.

References:
https://nmap.org/book/scan-methods-null-fin-xmas-scan.html
Read more

How To Track Iphone Without Them Knowing

Few feelings are as stomach-sinkingly awful as the thought of losing an expensive new iPhone. Whether you left it on the bus or someone slid it out of your back pocket, we put so much store in our phones that their loss leaves is saddened and angered. Most of us keep at least copies of everything in our lives on our phones, from personal conversations to emails, 


To say nothing of all our personal information and social media accounts. Of course there are security measures in place, but nobody wants to risk having all that information fall into the hands of the wrong people. In this article, I will show you how to find a phone that has been lost, whether your own phone or the phone of a friend or family member.

Can you track an iPhone without them knowing?

First off, hopefully you activated the Find My Phone feature of your iPhone when you still had it in your possession. Secondly, if your phone doesn't have service (and thus a connection to the Internet) or if you don't have iCloud set up, then these solutions are not going to work for you. Unfortunately phone technology is advanced but it isn't magical; if your phone isn't talking to the network or if you haven't turned on Find My Phone, then unfortunately the technological solution is probably not going to work. (Seriously. If you have possession of your phone(s) then stop reading this article, pick up your devices, go to Settings and select "Find My Phone" (iPhone) or "Find My Device" (Android) and make sure they are toggled on. TTjem upi cam dp ot/"

Without further ado, let's find your phone!

Can I Tell if Someone is Tracking my iPhone?


image1-3

Usually yes, if someone is using the "Find my Phone" feature, it will be displaying things on the iPhone screen. Thankfully, "Find My iPhone" comes pre-loaded on all phones with iOs 9 or newer. "Find my iPhone" is the gold standard when it comes to locating your lost iPhone. The service is integrated as part of iCloud. Here's how to use it to find your missing iPhone then track down your phone's exact location.

Step 1: Open up the "Find My iPhone" on a different device

It doesn't matter if you decide to use your iPad, your laptop, or a friend's iPhone – you can run the Find My Phone app fr0m Mac. You can use the Find my Phone app.

If you are using an Apple product like another phone or an iPad, you can simply click on the app.

If you are using a computer (even a Windows PC will work), go to icloud.com then click on the "Find iPhone" icon. Once you've clicked on the "Find iPhone" icon the website process and "Find my iPhone" app process are the same.

Step 2: Input Your Apple ID Credentials (they are the same as your iCloud info)

Since you are not using your phone, you won't be automatically logged in.

Once you log in to the app, select the "All Devices" drop-down option and then find the device that you want to locate.

Step 3: Once You Select Your Phone, Options Will Appear

As soon as you select your device on the page, iCloud will begin to search for it. If the search is successful, you will see your device on a map, pinpointing it's location. Before you sprint out the door to get it, there are some other options you should take a look at.

Once you select your device you will have three additional options in addition to seeing your phone's location. These options are playing a sound, activating "Lost Mode" and erase the phone.

Playing the sound is a great way to find your phone if you lost it somewhere around your house. If you click the option, an audio alert will go off on your phone which will hopefully help you find it. The alert will sound like a loud pinging noise alerting you that your phone is at home with you and not at the coffee shop you just visited. If you hear the pinging sound then you'll quickly find your phone by just following the sound.

When enabled, Lost Mode will lock your phone with a passcode and will display a message of your choice. This can either ensure it will be safe until you can find it, or will alert the thief what you expect of them and that you know where they are. This mode can also enable location services on your phone too.

However, if things have gone too far and you think there is a very slim chance you will ever get your device back – perhaps your phone has already crossed an international border – the best course of action is to simply erase it. Yes, this is giving up, but it also prevents your personal information getting into the hands of someone who could abuse it.

If you follow these steps, you should have your phone back in your pocket in no time. 

Is there an app to track someones phone without them knowing?

maxresdefault-11

What if you're looking for someone else's phone? I'm sorry to burst your bubble, but you are not allowed to track someone else's phone without their knowledge. While there are supposedly apps that you can install on a target's phone to track it and keep tabs on what they are doing on it, that is completely illegal and immoral. In addition to the moral issue, there is the practical fact that they could find the app which could lead to a very awkward situation, possibly one involving the police.

However, there are times when you want to find a friend's phone and you have a legitimate reason, and (the important part) they have given you permission to find it. Just as when you were looking for your own phone, there is an app that can help you find the phones of your friends and family with ease. The "Find My Friends" app used to be an extra download, but now it comes with iOS, so if your friends have ever updated their phone, they should have it.

"Find My Friends" is an app that basically allows you to share your location with others and vice versa. It can be great for keeping track of where your kids are, knowing what your significant other is doing, or just keeping tabs on your friends. It can also help them find a lost phone (as long as you have "Shared Locations" with them). Here is how to set it up:

Step 1: Open the app on your phone and the phone of the person you want to be able to share locations with.

Step 2: Click your profile in the bottom left of the screen.

Step 3: Enable "Share My Location" and make sure AirDrop is enabled on your own phone.

Step 4: From there, your friends and family will be able to search/add you to share your location with them and vice versa. You each will need to accept the "Shared Location" request from the other. Now, you can just click on their profile in the app and keep track of them.

As you likely realized while reading this article, it is a much better idea to be proactive than reactive when it comes to tracking phones. If you set up "Find My iPhone" and "Find My Friends" before your phone gets stolen or lost, it will save you a lot of potential hassle down the road. While it may be a bit worrisome to have someone be able to see your location at all times, it can really save you once your phone goes missing and you need to track it down. It is obviously best to pick someone who you trust not to take advantage of the information an app like "Find My Friends" can provide them.

No one deserves to have their phone stolen or go missing, but thankfully, there are some ways to find it, or at least have the information deleted. Hopefully, this guide helped you be able to find your phone or the phone of your friends and family, or at least prepared you for when it may happen.

If you have other ways of finding a lost phone, please share them with us below!

@EVERYTHING NT

Read more


S2 Dynamic Tracer And Decompiler For Gdb

Decompiling is very useful for understanding srtipped binaries, most dissasemblers like IDA or Hopper have a plugin for decompiling binaries, generating a c like pseudocode.

Static analysis, is very useful in most of cases, specially when the binary is not so big, or when you just have an address where to start to analyze. But some algorithms will be learned in less time by dynamic analysis like tracing or debugging.

In cookiemonsters team, we are working on several tracers with different focus, but all of them mix the concept of tracing and decompiling to generate human-readable traces.

S2 is my tracer & decompiler plugin for gdb, very useful for ctfs.
Some of the features are:

- signed/unsigned detecion
- conditional pseudocode (if)
- syscall resolution
- unroll bucles
- used registers values
- mem states
- strings
- logging


More information

Tuesday, June 2, 2020

Pcap Of Wannacry Spreading Using EthernalBlue

Saw that a lot of people were looking for a pcap with WannaCry spreading Using EthernalBlue.

I have put together a little "petri dish" test environment and started looking for a sample that has the exploit. Some samples out there simply do not have the exploit code, and even tough they will encrypt the files locally, sometimes the mounted shares too, they would not spread.

Luckily, I have found this nice blog post from McAfee Labs: https://securingtomorrow.mcafee.com/mcafee-labs/analysis-wannacry-ransomware/ with the reference to the sample SHA256: 24d004a104d4d54034dbcffc2a4b19a11f39008a575aa614ea04703480b1022c (they keep referring to samples with MD5, which is still a very-very bad practice, but the hash is MD5: DB349B97C37D22F5EA1D1841E3C89EB4)

Once I got the sample from the VxStream Sandbox site, dropped it in the test environment, and monitored it with Security Onion. I was super happy to see it spreading, despite the fact that for the first run my Windows 7 x64 VM went to BSOD as the EthernalBlue exploit failed.

But the second run was a full success, all my Windows 7 VMs got infected. Brad was so kind and made a guest blog post at one of my favorite sites, www.malware-traffic-analysis.net so you can find the pcap, description of the test environment and some screenshots here: http://malware-traffic-analysis.net/2017/05/18/index2.html

Continue reading


  1. Pentest Process
  2. Hacking Health
  3. Pentest+ Vs Ceh
  4. Pentest Meaning
  5. Pentest Kit
  6. Pentest News
  7. Pentesterlab
  8. Pentest Tools Framework
  9. Pentest Certification
  10. Pentest Box
  11. Hacking Forums
  12. Pentest +
  13. Hacking Online Games